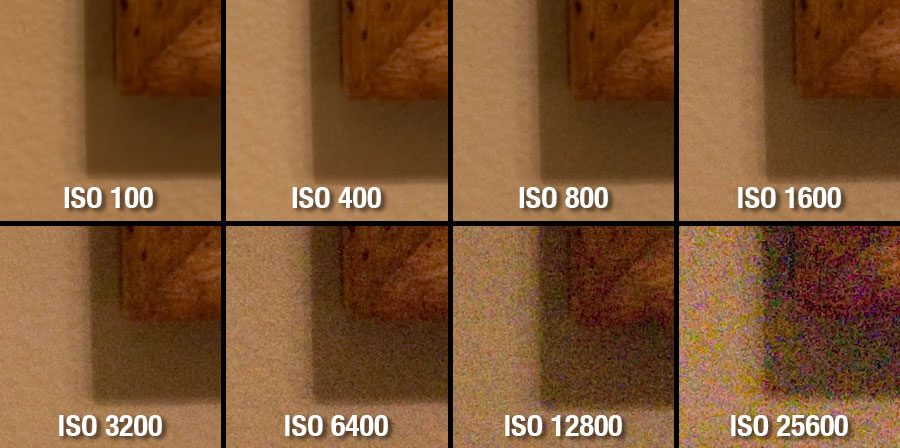
Aperture, shutter speed and ISO combine to make up the exposure triangle, which is the foundation of photography. It is crucial that you understand all three of these elements, and how they work together to create an exposure. In basic terms, the ISO setting determines your camera sensor’s level of sensitivity to light. Read on to learn more about ISO, and why it is so important.
ISO Information
ISO stands for International Standards Organization, and can be set at a low or high number depending on the
available light in your scene, and your specific needs for a particular shot. The image sensor is a very important element of your camera, and is responsible for collecting light and converting that light into a photographic image.
Let’s look at it in a very simple way:
- The lower your ISO setting = the less sensitive your camera is to light.
- The higher your ISO setting = the more sensitive your camera is to light.
If you want to produce the highest-quality image – in a technical sense – you should use the lowest ISO (commonly referred to as “Base ISO”) that you possibly can. This is not always possible, as you will most likely shoot in low-light situations from time to time. In some of these “darker Kodak moments,” you can use a flash (preferably an external one, not the pop-up flash on your camera), but it really depends on the scene you are aiming to capture. External flashes are great because they allow you to keep your ISO relatively low while still capturing a sharp, well-lit image. Certain environments don’t lend too well to flash photography, so you will have to make do with a higher ISO in some situations.
When increasing your ISO, try to do so as little as possible, as in the following example:
You have determined that you cannot use ISO 200 because your shutter speeds at this ISO are not fast enough to get sharp shots hand-held. Increase your ISO to 400 and see how long your new exposure time is. If it is fast enough to produce a crisp image at ISO 400, there is no need to increase it more. Like I wrote earlier, you want to use the lowest ISO you can, so keep this in mind when increasing your ISO.
Evaluate the available light in your scene and take some test shots to determine the minimum ISO you can use to get sharp photographs. Also, keep in mind that if there will be movement that you’re trying to freeze, you will have to use faster shutter speeds. This means you will have to set your camera to a higher ISO. If you’re shooting an event, get to the location 20 minutes early so you can assess the available light, and figure out what ISO you should use. The more you shoot, the better you will get at figuring out the appropriate ISO for a given situation, as well as all of your camera’s settings.
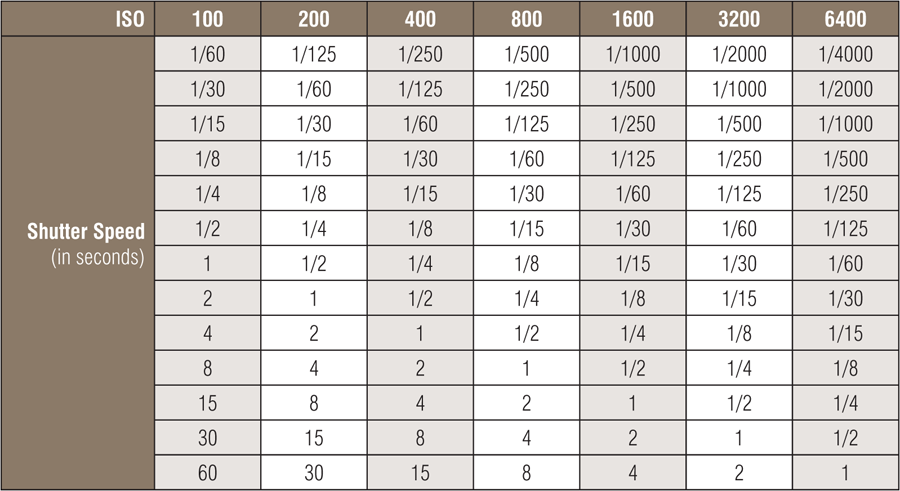
ISO Reference Table
When you double your ISO, you are effectively doubling your camera sensor’s sensitivity to light. This means that if you have a shutter speed of 1/4 second at ISO 100, your shutter speed will increase to 1/8 second at ISO 200. Use this handy reference graphic below to see how increasing your ISO affects shutter speed.

Understanding how ISO works is very important in photography. When you have a solid understanding of how ISO, aperture and shutter speed work together, you will be able to more effectively control your camera. You won’t have to rely on Auto mode, and will know why certain settings work better in given situations. As with everything, practice makes perfect – so get out there and take some pictures 🙂
Do you have something to add? Please leave a comment or question below, and I will respond to it as quickly as possible.
Did you like this post? Feel free to share it and subscribe to our newsletter for helpful photography tips, resources and information delivered straight to your inbox. Simply enter your email in the opt-in above. Your email address is safe with us, and we will never share it.

