White balance is a setting on your camera which is used to control how colors are captured in different types of light. When you correctly set your white balance, you are taking into account the “color temperature” of the light in your scene. Color temperatures range from cool (blue tint) to warm (orange tint). Using the right white balance setting will eliminate unwanted color casts that can ruin your image and make it appear unnatural. In this post, you will learn about white balance, and why it’s important if you want to reproduce colors accurately in your images.
White Balance Settings
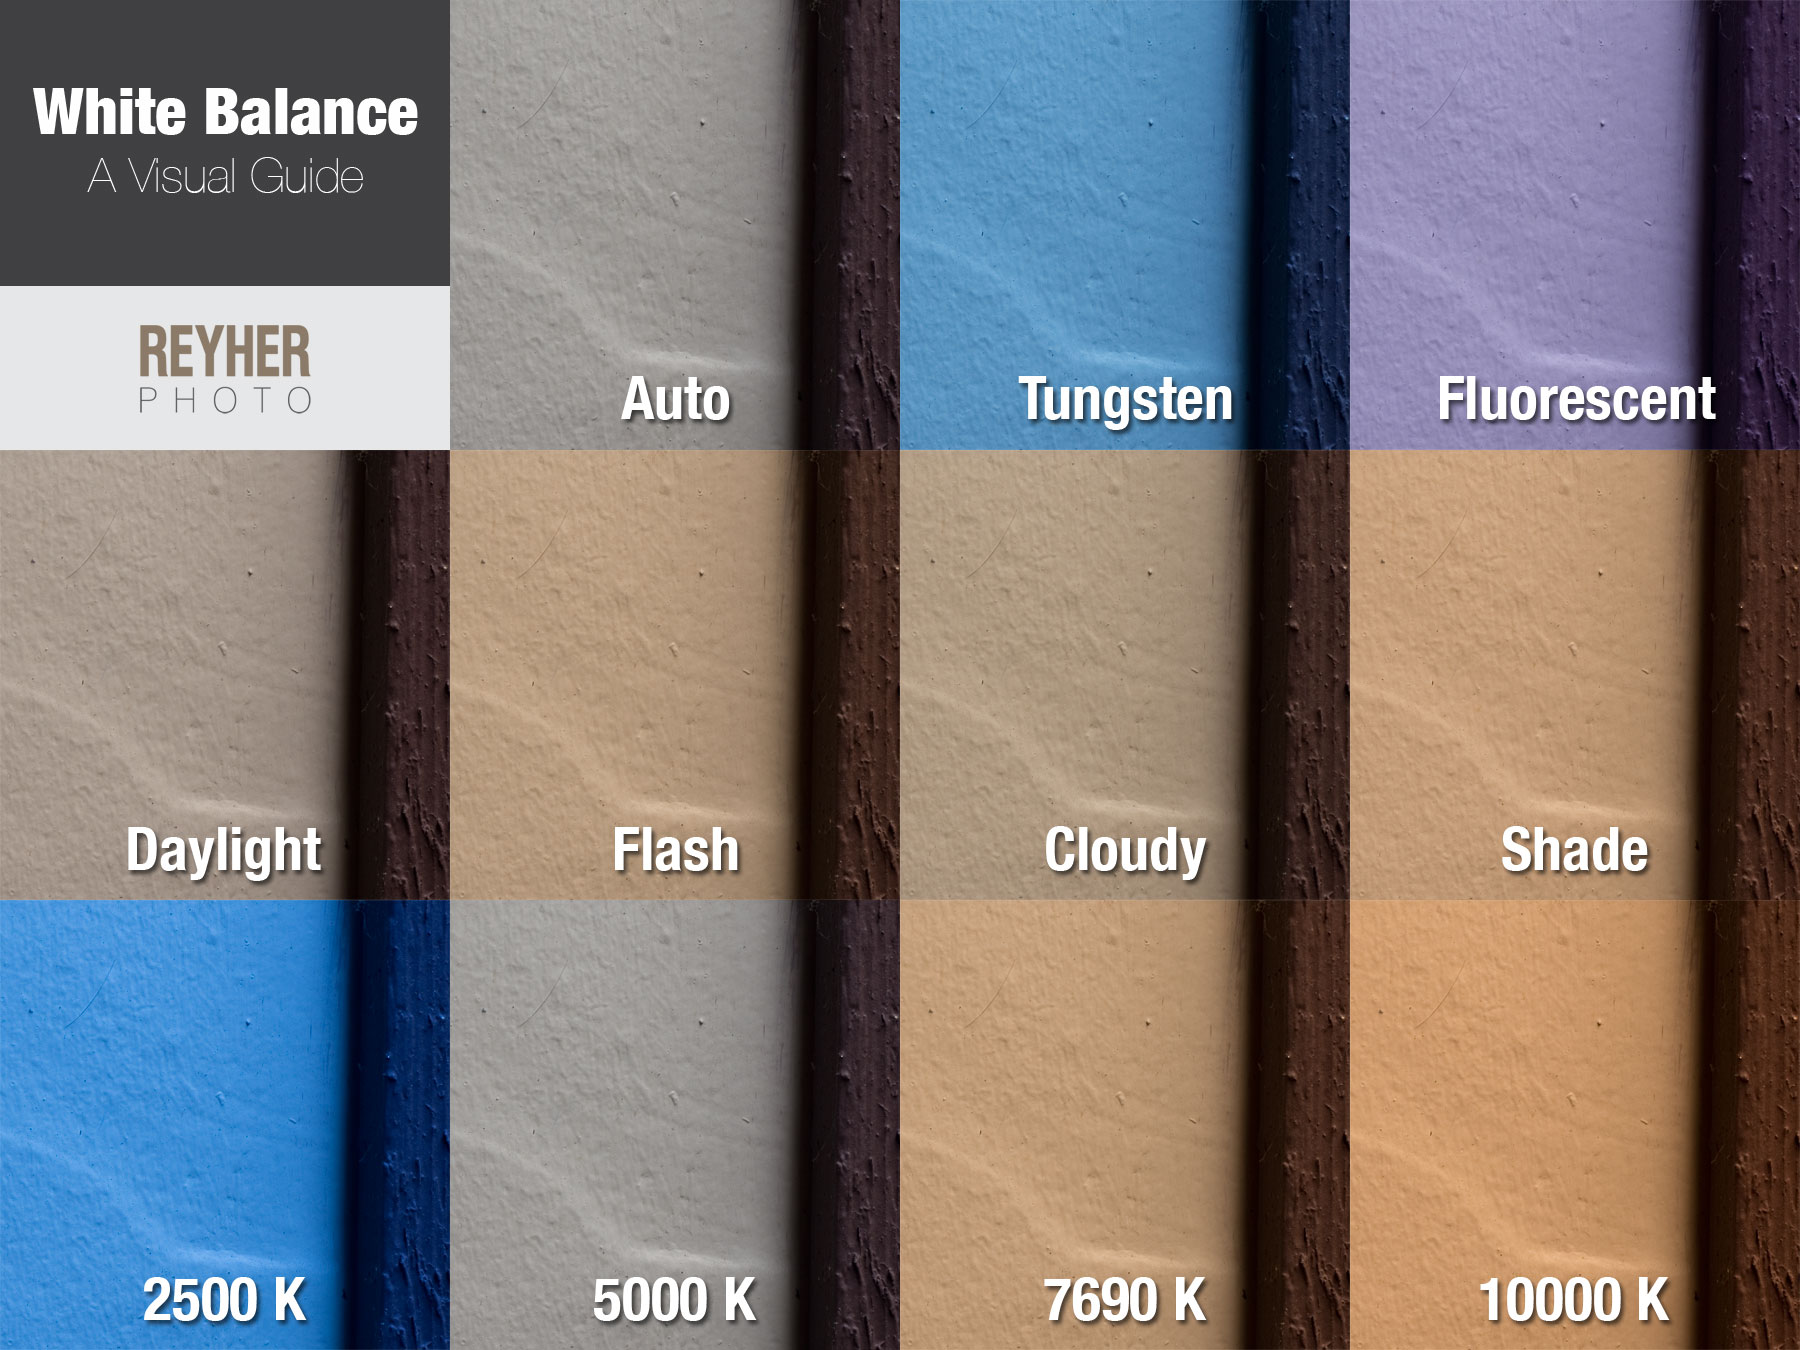
White does not always appear true in different lighting, and ranges from cool (blue tint) to warm (orange tint) temperatures, measured in degrees Kelvin. Because of this, there are numerous standard white balance settings appropriate for any kind of lighting you would shoot in. In addition, there are custom settings and Kelvin temperature settings you can use. Basically, your camera is adjusting the appearance of white based on the setting you choose.
On modern digital cameras, you can choose from the following standard white balance presets:
Auto
With this setting, your camera makes an educated guess by reading the scene you’re shooting in. Honestly, I don’t know the technical aspects behind how it works, despite extensive googling of the subject. I do know that it is not always that accurate, and can be fooled.
Tungsten
This is the white balance setting to use when shooting indoors under incandescent lights. Tungsten lighting gives off an orange tint, so this white balance cools off the colors by adding a little blue hue.
Fluorescent
Use this setting while shooting indoors with fluorescent lights. These bulbs seem to produce a fairly neutral color, but are actually a little cool and give off a blue tint. Fluorescent white balance warms up the color by adding a little bit of orange.
Daylight/Sunlight
As the name implies, this is the setting you want to use when you are taking pictures outside under sunlight. It has a relatively neutral white balance setting (neither orange or blue tint).
Cloudy
This white balance is ideal for shooting outdoors on overcast days, and is slightly warmer than daylight white balance.
Flash
The light produced by pop-up and external/off-camera flashes is cool (blue tint) and this setting warms up the colors a good amount.
Shade
Colors in the shade are cooler (literally and figuratively :)) than those in the sun, so this setting adds a little orange tint to your image to warm things up a bit.
Manual Settings
In addition to the settings listed above, you can set white balance color temperatures in Kelvin, ranging from 2500K to 10,000K (as seen in the image above) with 2500K adding a deep blue tint and 10,000K adding a deep orange tint. Some cameras even give you the option of setting custom white balances that you configure yourself with the help of a white card. By taking a photo of a white card (make sure to fill the frame with it) under the light you plan to shoot in, your camera will configure the optimal setting by ensuring the card in the resulting image is totally white. This is the most accurate method for setting white balance in a given situation, but I have never used it.
For the majority of situations you shoot in, it will be quick and easy to set the white balance using any of the standard presets listed above (Auto – Shade). In instances where you’re faced with unique or mixed lighting, you may want to give the manual white balance settings a try instead.
Please note that your camera may have slightly different white balance settings than the ones listed above, which are from my Nikon D610. The above-listed should be viewed only as a general guide.
Does White Balance Matter if I Shoot RAW?
Many photographers insist that you don’t need to pay attention to your white balance settings while shooting, provided you are capturing RAW files. They claim that RAW files can be easily corrected in post production, and that you should just shoot in Auto white balance all the time, then correct it later in post-processing (using Adobe Lightroom, Photoshop or other image editing software). You can also correct color casts on JPEG images, but it’s not as easy as it is with a RAW file, and you have to play around with the color balance a little more. Depending on the light, you may not be able to achieve the same result with a JPEG as you can with a RAW file. It’s best to always shoot RAW anyway.
There is no right or wrong answer, it depends on personal preference. You can get accurate/natural colors in your images either way – setting the optimal white balance on your camera before pressing the shutter, or adjusting the color later on your computer. Personally, I prefer to set the white balance on my camera. I am used to this method, and it takes a fraction of a second to set the white balance before I press the shutter.
Conclusion
Understanding white balance is key to reproducing colors in images as they were in real life. By setting the optimal white balance on your camera or adjusting it later in post-processing, you will be able to accurately display colors for images shot in a wide variety of different lighting situations. Make sure to shoot RAW for added flexibility in post-processing.
If you have comments, questions or other helpful white balance tips, please leave them in the comments section below. I will respond as soon as possible.
If you’re looking to take your photography to the next level, subscribe to my photo newsletter with helpful tips, resources and information. Simply enter your email in the opt-in at the top of the page (or one of the other two that appear on my site), and you will receive blog post notifications directly in your inbox. NO SPAM, and I will never sell your email address.