Modern digital cameras are complex pieces of equipment with a wide variety of settings you can use to control how images are captured. One of these many settings is called metering, which is used to measure the light reflected off of the subject/s you are shooting. Understanding your camera’s metering modes and when to use each of them is crucial when it comes to properly exposing your images. In this post, you will learn how metering works and why it is important to keep it in mind while shooting.
What is a Light Meter?
Built-In Light Meter
Your camera’s light meter is a built-in sensor that measures the brightness of your subject. Using this information, it determines the ideal exposure for your scene by adjusting the aperture (or f-number), shutter speed and ISO accordingly. Your camera does not simply measure the brightness of the entire frame, but rather analyzes the brightness of the reflected light from multiple areas individually within the frame. The metering mode you use determines which areas of the frame the meter sensor uses to measure the brightness of your subject.
All modern DSLRs are equipped with built-in light sensors that accurately measure the reflected light in your scene to determine the ideal image exposure. There are three common metering modes that modern DSLR cameras are equipped with, including Matrix, Center-weighted and Spot metering. Canon cameras also have what is known as Partial metering, which is similar to Spot metering, but it takes a reflected light reading from a larger area of the frame.
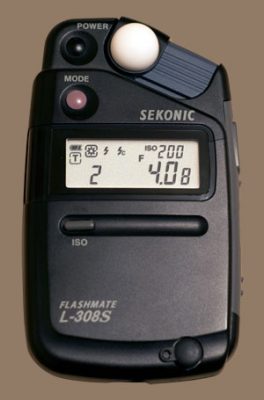
External Light Meter
Have you seen people walking around with a gadget and holding it up to a model’s face before? This is what is known as an external light meter. These are particularly useful for shooting studio portraits and product shots, but are great for many types of photography. Instead of measuring the light reflected off your subject (reflected light), an external light meter measures the light falling on your subject (incident light). This is a much more accurate way to meter the light.
Metering is Not Always Accurate
Built-in camera light meters measure light which bounces off your subject (reflected light), not the light that hits your subject (incident light). Therefore, if your subject is lighter or darker than middle gray (between 10-18% reflectance), your meter will inaccurately calculate and either under or overexpose the image.
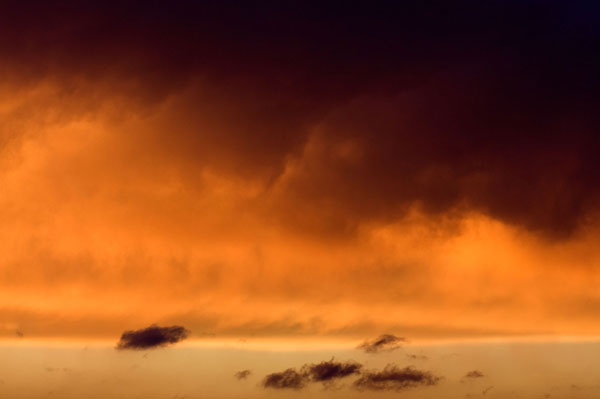
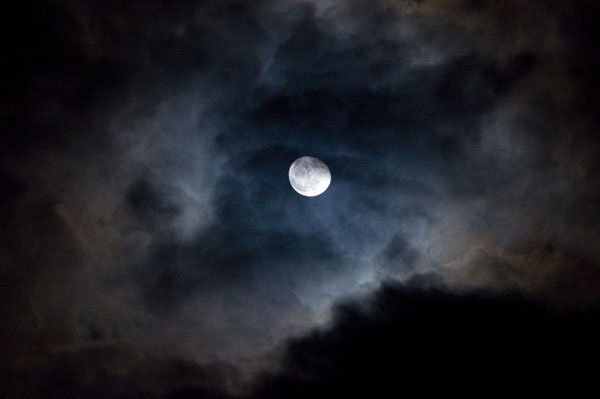
Your camera’s light meter works very well when the reflectance in your frame is diverse, or there is an even range of light and dark objects. In many of these instances, the average reflectance of the scene will be close to middle gray, and your meter will take an accurate reading. In some cases, however, your scene may have a great imbalance when it comes to reflected light of your subjects. This will trick your light meter, and give you an incorrect reading.
The following are examples in which your light meter is likely to give you an incorrect reading:
- A very bright scene, such as a snow-covered landscape. In this kind of situation, your camera’s light meter is tricked because the white snow does not average to middle gray. The snow is brighter, so your camera will underexpose the image.
- A dark scene, such as a wall painted black or some other dark color. Shooting this kind of dark subject, your camera will overexpose the photo because the dark color does not average to middle gray either.
In the above situations, using exposure compensation can help you achieve the ideal exposure.
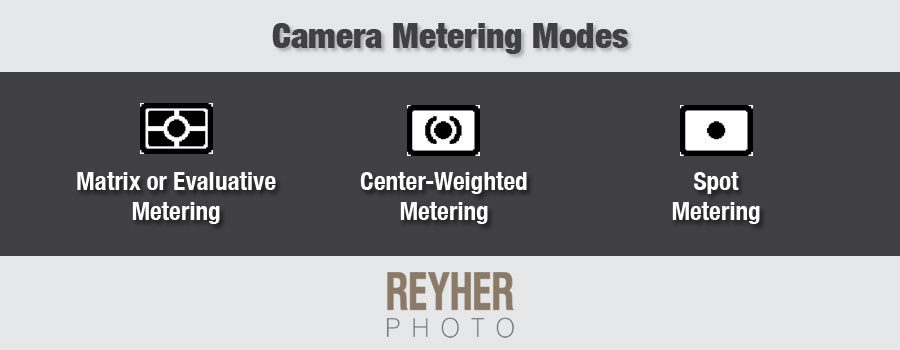
Metering Modes
Matrix or Evaluative Metering
Matrix or evaluative metering mode gathers information from 1005 red, green and blue sensors to calculate the proper exposure. It also factors in distance information provided by the lens on your camera. This metering mode analyzes the overall brightness, contrast and other lighting characteristics of a scene, divided up into multiple zones. Once it analyzes the highlights and shadows in each zone, it averages all the zones and determines the proper exposure based on that number. The focus point, distance between you and your subject, as well as the colors in the frame are all taken into account with this metering mode.
When to Use Matrix or Evaluative Metering
Matrix or Evaluative is the default metering mode on most DSLRs and works very well in the majority of situations. It does a good job determining the proper exposure in a variety of lighting conditions. Modern DSLRs have very advanced matrix metering systems that are ideal for assessing the light in a variety of scenes, and yielding balanced results. Typically, you would select this setting, and leave it until you are faced with a unique situation that would benefit from center-weighted or spot metering.
Center-Weighted Metering

Center-weighted metering places the most importance (approximately 60-80%) on the light in the center of your frame to determine the correct exposure. It does not disregard light in the other parts of the frame, but gives it much less “weight” in the overall calculation for exposure. On some camera models, you can even adjust the size of the circle. This is a very consistent metering mode, as your subjects will often be in or near the center of the frame. Center-weighted is the default on many point and shoot cameras that don’t allow you to switch between metering modes.
When to Use Center-Weighted Metering
Center-weighted metering is regarded as the best mode to use when shooting portraits. Using it, you can guarantee that the subject is properly exposed, without giving too much weight to the background. After all, it is more important that your subject (person or animal) is exposed correctly, and not the surrounding area. It is widely regarded as a more predictable metering mode than matrix metering, and one that delivers more consistent results for portrait photography.
Spot Metering
Spot metering is very useful when your subject is in unique lighting conditions. It is ideal when you need an accurate reading for a small segment of your frame (approximately 1-5%). Spot metering will evaluate the light from the center of the frame, the focus point or other specified area of your scene. Every camera manufacturer offers different options in regards to spot metering. Spot metering works very well in scenes with high contrast, and ones in which your subject is in a shadow or backlit by bright lights. By accurately metering the light on your subject, you can properly expose it… and not the light surrounding it.
When To Use Spot Metering
Spot metering is mainly used by professional photographers, and only in certain situations. Say, for example, that you are trying to take a photo of a person in front of strong backlighting. If you use either of the other modes, you will severely underexpose your subject. Using spot metering, you can meter off your subject’s face and properly expose the shot. You will have to keep in mind the reflectance of the subject you are metering, and may have to make adjustments to nail the exposure. In any situation where your subject is significantly lighter or darker than his/her surroundings, spot metering can be really helpful.
Conclusion
Metering the light in your frame is absolutely crucial to properly exposing your photographs. By learning the different metering modes on your camera, you will know when to use each of them for optimal results. Keep in mind that when you are shooting very bright or dark scenes, your camera may be tricked and either under or overexpose the image. In these situations, exposure compensation can help you nail the exposure. Now, get out there and shoot.
Did you like this post? Feel free to share it and subscribe to our newsletter for helpful photography tips, resources and information delivered straight to your inbox. Simply enter your email in the opt-in above. Your email address is safe with us, and we will never share it.
Feel free to leave your questions and/or comments below. I will respond as soon as possible.